Friday, December 25, 2015

Zingy Green Bean Casserole

I went to my daughter's for a Christmas Eve cookout. She was excited about the two all time favorites the corn pudding with Jiffy Mix and the traditional green bean casserole. One of her friends said that it took him about an hour but he made a mean green bean casserole. That got me thinking...does it really  have to be so traditional and this is what transpired that got raves on Christmas eve and again at my house on Christmas day.

2 bags of frozen green beans  about 4 cups (you can use two cans of green beans as well) I did not use the french style just the regular cut green beans.
2 cans of mushroom soup
3/4 cup of milk
1 can of mushrooms drained
1Tbsp. of Worcestershire Sauce I used instead of Soy Sauce!!
1/2 tsp of Hot Sauce...I like Crystal brand use what you like and more if the taste suits
1/2 tsp of course black pepper
1 1/2 Tins of French Fried Onions

Preheat oven to 350 degrees F or  176.667°C
Cook the beans on top of the stove until either unfrozen or if canned the liquid is mostly evaporated-the liquid will help dilute the soup but don't leave more than about a 1/2 cup. Add to the pan the mushroom soup and the 3/4 cup of milk. Mix and continue on the heat until the soup has become soupy...LOL. Add the hot sauce, worcestershire sauce, pepper,mushrooms and continue mixing. Then refine to taste the tanginess that you are desiring by adding a dash or two more hot sauce.
Add 3/4s of the fried onions to the mixture and make sure they are mixed around evenly. Place in a 9x9 casserole dish or one close to that size and then top with the rest of the fried onions. Place in the oven and heat for 25 minutes.

When removed from oven, let set for at least 10 minutes before serving. Enjoy!!

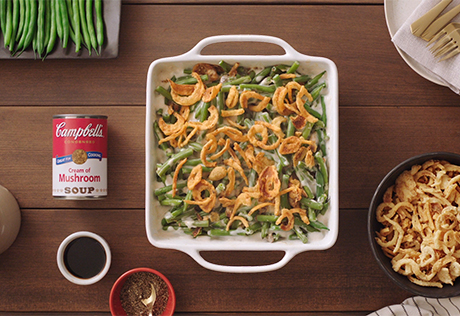
The picture below is that of the original Campbell's green bean casserole from their website.

Tuesday, November 24, 2015

Chicken Thigh Gumbo

Today both my husband and I have felt a bit under the weather. So the only thing to resort to is chicken soup but having to work with what I had on hand it turned into a healthy gumbo. This is an easy dump it all into the pot recipe which is done from start to finish in about 40 minutes.
I will update with a picture later.

Four chicken thighs
1 onion
3/4 cup of rice
1/2 bag of frozen gumbo vegetables
1 tsp of cilantro
1/4 tsp of Old Bay Seasoning
1/8 tsp of cumin
dash of salt
3 cups of water
1/8 cup of vegetable oil

Place the oil into the bottom of the pressure cooker and turn on saute. Chop and add onion, chicken and spices. When onions start to become translucent and the chicken is seered...not brown just a little less pink add the water, rice and gumbo vegetables. Place the top on the pressure cooker and move from saute to poultry for 35 minutes. When it is done you might want to add more salt or some pepper. Serve with some French bread and your done.

We found it tasty and we felt better after eating it...hope you enjoy too.

Saturday, July 11, 2015

Real Florida Chicken Thighs and Rice


Now you are going to think this is a chicken and citrus recipe because everyone equates Florida with oranges, grapefruit and of course the Key Lime. Well there is another part of Florida where the cowboys and Indians roam that brings another whole taste to the table. This is the central part of the state where they raise cattle and sugarcane.

Most tourist only see the beaches and what they think is Florida but there is another whole world to behold when you get into Desoto, Hendry and the other counties in the middle of the state. In Hendry county is a great place named Labelle. The people are friendly and the food is amazing. A butcher who lived there back in the 1940's always made a seasoning for his customers to use on their meats. It because very popular and a favorite of everyone in the area. He had began the development in Saipan when he was a mess sergeant in the army. He actually started to market it as Everglades Seasoning in 1976.  My chicken recipe is easy, fast and of course uses that great seasoning as its core flavor. http://www.evergladesseasoning.com/

Soak 4-6 chicken thighs (bone in and skin on) in about a quart of water and 1/8 cup of apple cider vinegar for 10 minutes or so and then rinse.

In your electric pressure cooker add about 1/4 cup of vegetable oil and let it heat on saute.
Add 1 tsp of Everglades Seasoning and smell the aroma
Slowly add a couple or three chicken thighs and brown on saute turn them and when brown on all sides remove and add the next two or three. You might want to shake in a bit more of the Everglades Seasoning to make sure they get to bathe in that great blend of spices.

When all the chicken are browned remove from the pressure cooker and add  2 cups of rice to the oil. Stir the rice around so it doesn't stick to the bottom of the pan. Then add either 1 Cup of chicken stock and 3 Cups of water or 4 Cups of water. The chicken stock will make it a bit stronger than just the water alone....just sayin- you be the judge of your palate.

Lay that chicken on top of the rice skin side down and place the lid on. Set the pressure cooker for 24 minutes on the poultry setting. When the  pressure cooker finishes let the pressure off manually so the rice doesn't get mooshie.

Then add one can of small red beans in chili sauce. This will add that one last taste to this already flavorful and aromatic dish.  Mix them in and serve. Now you are tasting the old Florida flavors which the pioneering families
came to know and love.

Everglade seasonings

Thursday, July 9, 2015

Oriental Chicken Breasts

I found this recipe for garlic chicken and it looked oh so yummy. When I started the process of making it and adding the chicken stock laced with the spices it was so dull I knew it was not going to be a big hit. Then the Sweet Baby Rays BBQ sauce would have come out and that would be the end of the chicken ala garlic.

So below is the new and zingier version which we will see if it meets the taste expectations of the hubby.

Use the saute function of the pressure cooker and melt 3/4 of a stick of butter.

Rinse 3 large or 4 medium boneless, skinless breasts

Combine is a small dish:
1/8 tsp of salt  OR NO SALT AT ALL!!!
1 tsp of black course pepper
2 tsps of garlic powder

Coat the chicken with the above mixture and place in the chicken in the bottom of the pressure cooker to brown and seer in the coating


In a larger dish combine:
1 cup of chicken broth
1 minced clove of garlic
3 Tablespoons of honey
1/2Tablespoon of soy sauce (low sodium will work or teriyaki sauce for more zing)
1/2 tsp of Indian Curry mild not hot

Pour the mixture over the chicken and place the lid on the pressure cooker securely. Set on poultry for 10 minutes at high pressure.
When finished release the pressure manually and serve over noodles, rice or greens.

One Note : I cut the soy sauce and salt way back in this recipe because the broth had a very salty taste. If you like that taste up and it won't send your blood pressure through the roof, then add more soy sauce to taste and keep the salt in the beginning.

Thursday, July 2, 2015

Fat Flush Soup in the Pressure Cooker

If you are not familiar with the Fat Flush Soup Diet, well this is a great one which is easy and satisfying. One of my sons, Steven, had moved his weight to almost 400 lbs due to becoming depressed about his life situation. He went to counseling and the  counselor suggested this great soup and Ann Louise, the First Lady of Nutrition.

He lost from the top weight of about 385 lbs down to 195 lbs by eating a veggie omelet for breakfast and about 11:30 AM when he got hungry ate a coffee mug full of soup every couple of hours or so until dinner time. Then he ate a small piece of meat, salad and if he needed more ate the soup. This took about six months and he never got bored because you can use different meats, veggies and beans in the soup to change the taste.

Steven has kept the weight off for over two years now and when he thinks he is going to fall off the good habits he has established goes back on the soup to get back on track. He has helped a lot of people lose and keep weight off too by telling them about the diet and how he has used it for his success.

Here is the link to Ann Louise's website and the basic recipe.

http://annlouise.com/2012/10/18/my-fat-flush-soup-diet/

http://annlouise.com/project/fat-flush-soup-diet-womens-world/


 Steven at almost his heaviest above....
This is a skinnier version but he is smaller than this now.

Chicken Fried Cubed Steak and Gravy

A couple of weeks ago I needed a really quick meal because I was home late from work to a starving husband. No he can't or won't cook. Anyway, I digress, I had some cube steaks in the fridge that needed cooking and thought I would just do in the skillet and serve over some rice I had made the day before. When I got them breaded and in the skillet they were not looking like I wanted so drug out my pressure cooker and put about 1/8 cup or less of oil in the bottom set the pot on saute. Then I just threw the steaks in a couple at a time and finished the browning process in the pot. Being tired and lazy I just added about two cups of water to them and some cumin on top and attached the lid. Set the pot on meat and let it cook.

Well as you can see in the picture below they were amazing. After 35 minutes in the Instapot I took the steam down and opened the lid they looked yummy. When I pulled the steaks out and added a about a 1/2 cup of milk to the gravy and stirred it was heaven for the mouth.

I put them on the plate with rice and the gravy on the side. Add a green veggie and your are done.
Here is the recipe:

In a bowl place a cup of flour, a 1/2 tsp of salt and black pepper to taste. Rinse the steaks under water and dredge through the flour mixture. I use a small paperbag like a lunch bag and put the flour in that then throw the steaks in one at a time so it is not so messy plus I shake the bag and get them really coated.

Make sure your pressure cooker is set on saute or brown and add about 1/8 cup of vegetable oil. Brown the steaks in the oil on both side and add 2 cups of water. Then sprinkle about 1/2 tsp of cumin on top of  the steaks.

Finally place the top on the pressure cooker, set on the meat setting which should be about 35 minutes. Take the pressure off as soon as its finishes remove steaks add either 1/2 cup of milk or sour cream to the gravy, more salt and pepper to taste then serve.

You will get rave reviews and it is all in the pot!!!

Monday, June 8, 2015

Pinto Beans ...YUM

I grew up on pinto beans and cornbread. That was a staple of our diet up in the hills of West Virginia. My mother made them in the pressure cooker with fat back and they were to die for if you like beans. I wanted to do beans today and bring back those memories. Instead of fatback I used about three slices of bacon. Normally it would be turkey bacon because we try not to eat anything smarter than our dogs and pigs are very smart animals.

I used a one pound bag of pintos with the three slices of bacon chopped up and of course 1/8 cup of vegetable oil in the bottom of the pot to make sure that they didn't stick and to keep them from foaming. Foam can get into the pressure mechanism and gum it up as well.

For spices I added a dash of Everglade Seasoning, 1/2 tsp of cumin, and about 1/2 tsp. of salt. That was enough for flavor and there are other seasonings like pepper and maybe some more salt if needed when I serve them. Then I added about 5 Cups of water. Usually they call for 4 Cups but I like a bit more soup in my beans. Set the pressure cooker for 35 minutes or the bean/chili setting. I found that in the Instapot I needed to add about 10 more minutes to get them soft enough.

You can also add some cut up potatoes if you want more interest in your beans and let them cook on top of the beans. This time I just wanted the beans.

So the recipe goes like this:

1 pound of dry pinto beans
1/8 Cup of vegetable oil
3 slices of chopped up bacon or turkey bacon (you can be daring and use fatback or smoked turkey necks) If you do use fatback don't add salt
dash of Everglades Seasoning ( this is optional or if you can't get in your area use Adobo)
1/2 tsp of cumin (cumin goes great with everything but it is to your taste)
1/2 tsp of salt
5 Cups of water (4 Cups if you don't like a lot of soup)

35 to 45 minutes according to your pressure cooker...start with the least number of minutes and then add as needed.

I chopped up some onion to add to mine and.....

YUM!!


Sunday, June 7, 2015

Chicken and Veggies Stew

While doing some deep Spring cleaning we suddenly found ourselves hungry. So I went through the fridge to see what could go into the pressure cooker. So here is what you are seeing below:

Six boneless, skinless Tyson chicken thighs and one large onion sauted in about a 1/4 cup of oil. Then you add 1 tablespoon of cumin, 1/8 a tsp of course black pepper, 1/8 tsp of paprika, a splash of sea salt. As the seasonings are searing into the chicken and onion I chopped a half a head of cabbage and threw with about a half bag of baby carrots. For the final seasoning I added  one envelope of Lipton's Onion  Mushroom Recipe Secrets then three cups of water. I popped the top on the pressure cooker and set it for meats and stews. This is usually about 35 minutes on the Instapot. 

6 boneless skinless Tyson chicken thighs
One large onion
1/4 cup of oil ( your fav)
1 tablespoon of cumin (if you don't like cumin exchange if for Adobo or Everglade's Seasoning)
1/8 tsp of course black pepper
1/8 tsp. of paprika
splash of sea salt 
1/2 small head of cabbage
1/2 a pound of baby carrots
1 envelop of Lipton's Onion Mushroom Recipe Secrets (you can use Lipton soup or chicken base)
3 Cups of water 

Set pressure cooker at meat/stew and then wait  I served this over noodles to give it a bit more body. Also added more pepper and salt for my taste. Hope you like...BTW the cumin is an excellent addition to any meat. 


Friday, May 29, 2015

Chicken and Rice in a Hurry

Sorry to make this blog post without a picture but we ate it. I had some boneless chicken thighs that needed to  be use and not much time last night. So I pulled out the pressure cooker and went to work.

First I turned on the saute and threw in a chopped onion, a handful of fresh garlic, salt, pepper, adobe, and the chicken thighs into the bottom of the pressure cooker where I was heating about 1/8 a cup of oil (use your choice of oils). I let the onions turn to a little translucent and seared the chicken for about five minutes. 

Then I added a cup and a half of rice, two tablespoons of butter, and three cups of water. I made sure the butter was melted to give some flavor to the whole thing- nobody said it was healthy!!!  The top was ready to go on and push the meat/stew button and away we go. The cooking time was about 35 minutes under pressure.It came out really great. The rice was perfect. I let it rest as the chefs would say and then mixed it up a little. 

This was good, filling with a veggie on the side. We called it dinner and leftovers for the next day. I usually try to take a picture so you can see what it looks like but there was not time. The husband had his fork and knife in hand waiting for a plate to attack. 

Wednesday, May 27, 2015

Lynne Under Pressure.....Cooking

Greeting and salivations!
I am writing this blog because a friend of mine hooked me on using a pressure cooker to do fast meals. We were on our way to a program her daughter was doing and I was complaining about cooking and the mess every night. Every night is make the mess before we eat and clean the mess after we ate. After spending years a slave to the stove and feeding a family I wanted to plan my escape.

Kay, the friend, said that I needed something I didn't probably even know about-an electric pressure cooker. She extolled the virtues of the machine as we made our way up the interstate to Sarasota. She spoke about how pressure cooking locks in the flavors and cooks the contents in less than half the time. How the electric machines have so many safety features that you didn't have to worry about blowing it up like my mother's old fashion one. She talked about the machine being a slow cooker, being able to saute, and make rice all in the same pot-not at the same time. She enticed me with the removable stainless steel pot that can be had from 4 quarts to 8 quarts...whatever your heart or family size desires. I drooled at the thought of having a one pot meal which could be two meals which means two days of cooking in one. I could see myself down to two plates and two forks in the evening which means I get to watch Wheel of Fortune and Jeopardy!!! Oh what a dream this machine must be to offer that much freedom to a kitchen slave for the past forty years. The best memory I had of my mother's  pressure cooking offerings was the corn flake breaded pork chops that melted in your mouth. I am sure she used it for beans and other things but the pork chops were heavenly.

So the next day while I was working at home on paperwork in front of the television, I had the YouTube channel on watching whatever appeared from the many subjects that people post. Low and behold the InstaPot Channel popped up and there were an array of little videos on how to use it and what to make in it. This was a Tuesday. I went straight to Amazon and bought one which arrived on Thursday and had a roast in it by Friday. Who knew that you could have meat, potatoes, carrots, onions and celery in about forty minutes and leftovers for the next day!!!! My kitchen chains have been removed. Kay freed me from those days of spending at least two to three hours in the kitchen slaving over a stove and three or four pots cooking away spewing their contents on the stove that had to be cleaned after the conventions of the meal were done. It is serve from the pot and be done with the meal!!! What a concept.

After watching every YouTube video that featured a pressure cooker and reading every post on Pinterest, my friend Kay said it was time I either did a blog or a vlog. So here we are with the first  entry. I am including a picture of one of my eye of round roast and veggies...YUM!! Watch for recipes and tips to come.